I have a doctorate in Physical Therapy with specialization in Women's Health issues. I love what I do and I have the best patients ever! BUT- This is not a Physical Therapy blog (though I will share some cool tips in that area). Instead I am using this blog to share with everyone the very cool things I am always learning in life. Patients, friends, family, co-workers and things I have learned myself will contribute to this blog. Hope you find some cool new things for yourself! Enjoy!
Showing posts with label Health. Show all posts

Sunday, May 31, 2015

Shrimp Stir Fry

Ready for another super easy, low fat, low salt and gluten free meal??  I love simple and therefore I love my Wok.  Stir Fry is not only super easy and very flexible but FAST.  So fast in fact, you have to be fully prepared before you start putting anything in there.  Have everything cut up and ready to go.  TIP: Make sure all veggies and meats are DRY by patting them dry with a paper towel.  If there is excess water you will get a lot of smoking and spitting because of the high heat nature of the Wok.  TIP: Also, make sure you are using a high heat oil (Peanut, Grapeseed, Canola, Corn, Soybean or Coconut Oil) this will decrease smoking and bitterness. Olive Oil is not recommended for Stir Fry. 
TIP: cook the thicker and harder veggies first

Below is what I used but feel free to get creative and throw in veggies, spices, meats and/or fish.

Prep Time: 20 Mintues
Cook Time: 10 Minutes

Ingredients:
4-5 cups of broccoli florets (1-2 broccoli crowns)
1 yellow squash, sliced then quartered
1 zucchini, sliced then quartered
1 package of sliced mushrooms
2 bundles of scallions, chopped
1 bag raw frozen shrimp, de-shelled and deveined (I usually buy ones that are already deveined)
Parmesian Cheese
Cracked Pepper
Mrs Dash Garlic and Herb
Grapeseed Oil
(Prego is pictured because I originally thought I would put my stir fry in a red sauce but it was so good without it, I didn't use it)

Directions:
1) Heat oil in Wok or pan for no more than a minute and then add in the broccoli, squash and zucchini.  Sprinkle Mrs Dash and pepper over veggies.  Cook, stirring occasionally for 7 minutes (or less, watch it for when it starts getting soft)
2) Add the mushrooms and scallions and cook for another 3-4 minutes
3) Remove veggies and set aside
4) Cook shrimp (spread evenly on the bottom of the pan). Cook for 3-4 minutes until pink, flipping half way through.  I sprinkled pepper and Mrs Dash on these too. 
5) Add the veggies and mix well.  Cook an additional 3 minutes.
6) Remove from heat and let cool some then sprinkle with Parmesan Cheese

I served it over Thai noodles for my weekly lunches
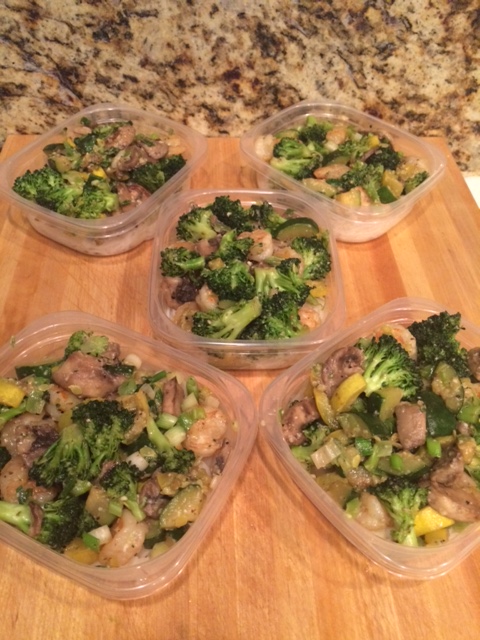
Enjoy!


Monday, May 25, 2015

Healthy & Easy Turkey Meatloaf

Looking for something easy and healthy for dinner tonight? How about the weeks lunches? This recipe is so easy and substitutions are simple.  Did I mention it is gluten free as well!?
Prep Time: 10 minutes
Cook Time: 60-70 minutes
Ingredients: 
20oz ground turkey (I use 95% lean)
1 zucchini, shredded
1 large carrot, shredded
1/2 of medium to large red or green pepper, diced (I get whatever is on sale)
1/4 white or yellow onion, chopped
1/2 tsp of minced garlic
1 egg 
1 packet of dry ranch dressing mix
2 gluten free crackers, crushed (not always needed, you can add more veggies to firm it up instead)

Directions:
1) Preheat oven to 350 F
2) Mix all ingredients together in a large bowl 
3) Put mixture in a loaf pan and pat down so it has a smooth top
4) Bake for 60 to 70 minutes.  Use a meat thermometer to ensure inside is 165 F

Tips:
*You do not need to grease the loaf pan as there is enough fat and water in the meat, it will not stick
*You will see water around the meatloaf when it comes out, just drain this off (careful not to let the meatloaf slide out as well)
*This is a great protein source for weekly lunches and food prep.  This will be my lunches this week - along with some mashed potatoes and brussel sprouts.


Tuesday, April 28, 2015

2-20 Butt by July Program

2-20 Arms by May was such a success I have put together the next installment.  It is all about the booty!  Twice a day keeps the jiggle away!  Feel free to modify as needed and if you don't know how, leave me a message and I will let you know how each can be modified.  The key to success is consistency.  Try not to miss but if you have to don't try to make up for it later - that is when injuries occur by overdoing it! 
Motivation Tip: Hang up your bathing suit or board shorts and think about how great your bum will look in them come July pool weather!!!
You can click on the image to make it bigger and you should be able to right click on it to save it.  I suggest saving it to your computer and printing it out.  I hang mine in my bathroom so I can see it and be reminded everyday.  We all wash our face and brush our teeth twice a day (or at least you should be hehe).  If you still have trouble with it feel free to message me your email and I will send you the PDF.

Monday, April 27, 2015

2-20 Arms by May WORKS

Confession, I wasn't sure just how good this program was going to work but below you will see my before and after pics.  Note: I had to take a week off towards the end because of a hernia issue (from extreme coughing, not the exercises) so it could have been even better! I can't wait to unveil by new challenge - 2-20 Butt by July...keep watch!
You may notice the @kshort2121 on many of my photos - that is because I am also posting them on Instagram and that is my Instagram name and how you can search for me.  I focus my Instagram page on optimal health, fitness and most recently business motivation, as I am now a business owner.

Sunday, March 22, 2015

Healthy Crock Pot Balsamic Chicken

 I started making this chicken by just throwing some ingredients together and over time I have perfected it to be the way I like it.  Every time I bring it to work, people ask for the recipe (It looks, smells and tastes delicious).  It is gluten free, low fat, low calorie, low sodium (or no sodium), Paleo and heart healthy, oh and did I mention - tasty and SUPER EASY!

Prep Time: 20 minutes
Cook Time: 3 hours (on High) to 6 hours (on Low)

Ingredients (Can be adapted to suit your dietary needs):
4 Organic Free Range Large Chicken Breasts
1 Red Onion, sliced thin
6 Medium Tomatoes (or 8 Roma Tomatoes), diced
10-15 Fresh Basil Leaves (chopped or I just tear mine into smaller pieces)
4 Cloves of Garlic, minced
1 Tbs of Grapeseed Oil or Olive Oil (Use olive oil if you want to go Paleo)
1/4 cup of Balsamic Vinegar
Fresh Cracked Pepper
Optional Pinch of Salt (I do not use this in mine anymore, I don't think it needs it)
Directions:
1) Thinly slice a red onion and place in bottom of the crock pot. TIP: I use crock pot liners to help with clean-up time (totally worth the money and the generic store brands work just as well as the name brands for half the price!)

2) Trim the chicken of any fat and lightly coat with the oil of your choice.  I just use a little oil for flavor and so that my pepper will stick.  Then crack fresh pepper over the chicken on both sides. If you are using salt add it as well, but just a pinch - the fresh ingredients and balsamic vinegar add a lot of flavor and you probably won't need the salt.

3) In a separate bowl combine diced tomatoes, minced garlic and FRESH Basil.  Fresh basil is a must - it completely makes the recipe!  TIP: after I rinse the basil I do not pat it dry, this little bit of extra water is the only water I have in the recipe.
4) Pour this mixture over the chicken so that the chicken is covered by it and then pour the balsamic vinegar over the top.
5) Cover and cook on LOW for 6 hours or HIGH for 3 hours.  TIP: As with all slow cooker recipes, avoid peaking at it until it is finished or cooking time will be off.

*You could serve this over rice or quinoa but honestly, I love it just like this.
*You could probably save time and used canned diced tomatoes but this will add sodium and preservatives.

Additional TIP: This is perfect for work week lunches if you are doing food prep. High protein, filling and healthy - and you'll make your coworkers envious!
 Enjoy!


Sunday, March 1, 2015

Pre-cut Your Butter - Kitchen Help

This is a great tip for those whom are:
-Watching their weight
-Preparing meals on a busy/tight schedule
-Having a dinner party and need pre-sliced pieces
-OCD and hate the crumbs and food particles that get on the butter with repetitive use

Directions:
Make sure the butter is cold (not softened) and use a sharp knife for accurate measurement.  Use the grid on the paper that the butter comes in and pre-slice your butter into tablespoon and teaspoon measurements.  Place the slices in air-tight Tupperware and store in the fridge.  When you are ready you can take out one slice at a time (saving on time and clean-up - no knife to wash)


Tank Top Season is coming - BE READY

Check out my newest fitness challenge!  It's my 2-20 Arms by May!
The idea is that you do a little bit each day and you will see results in 2 months!
Two sets of 20 reps each day is all you need.  I have provided a check off sheet so that you can stay motivated each day.  If you miss a session or whole day, just move on - there is no making it up at the end (that is when injuries can occur).  Stay motivated and stick with it!  GOOD LUCK.
Tip: Take a before and after pic!  Also, pull out your favorite tank top for constant reminder and motivation!

Saturday, September 20, 2014

Make it yourself - Starbucks Iced Green Tea

I absolutely love Starbucks Iced Green Tea and have a bit of an addiction to it.  However, I once sat down in wonder of what I was spending on a yearly basis and discovered that a Venti a day (my habit) came to $1095/year....IN TEA CONSUMPTION!! I am way too thrifty to spend that, "who am I Rockefeller?" So I began the process of mastering the recipe so that I could make it at home.  It took me a number of batches over a 3 week period but I am happy to say that I have perfected it and even happier to share it with you all!

What you will need:
An Iced Tea Maker ($20-$40 - the one seen in this post was $39.99 on Amazon)
Tazo Zen Green Tea (Amazon has 6 boxes of 24 bags for $25.07.  This will yield 96 Venti servings)
4-6 Pint Size Mason Jars ($8-$14 - the blue ones in the post were $13.99 for 6 on Amazon)
28oz Shaker ($8.95 for the pink on Amazon or blue and black combo pack for $14.55)
Water
Ice

Directions:
1) Fill iced tea maker with 4 cups of cold water  
2) DO NOT ADD ICE to the pitcher as you would normal tea (this is secret number one, it needs to be concentrated)
3) Use 6 tea bags of Tazo Zen Green Tea
 
 4) Brew at the highest strength (if your brewer gives you the option)

5) Using 4 mason jars add 1 cup of concentrate to each and let cool, if you can (I often do this at night and have put them away warm)

6) Cover each with lids and store in fridge, up to 7 days (second secret, it needs to be in an air tight container)
7) When ready to drink fill your cup with desired amount of ice, add the cup of concentrate and the rest water then transfer to a shaker - DO NOT USE THE SHAKER BALL
8) Shake well (this is the final secret, it must be shaken)
9) Put back in your desired cup and enjoy!
**I saved some of my Starbucks cups so I wash them and use those over and over and I feel like I'm drinking the real thing.

Special Note: This recipe is for UNSWEETENED Green Tea - As a health conscious person I am not a fan of sugar or the 120 cal, 30g of sugar it would add to sweeten it (not to mention the taste).

SAVINGS:  Ready for this - the tea alone will cost you $95/year (if you drink a Venti a day like me)!  A SAVINGS OF $1000 a year!!! Think of what else you can buy with that! 
Looks the same, right?